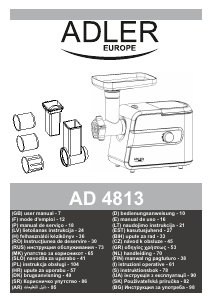
Priručnik Adler AD 4803 Stroj za mljevenje mesa

Trebate priručnik za svoj Adler AD 4803 Stroj za mljevenje mesa? U nastavku možete pogledati i besplatno preuzeti PDF priručnik na hrvatskom jeziku. Ovaj proizvod trenutno ima 3 često postavljanih pitanja, 0 komentara i ima 0 glasova. Ako ovo nije priručnik koji želite, kontaktirajte nas.

Vaš je proizvod neispravan i priručnik ne nudi rješenja? Otvorite Repair Café za besplatne usluge popravka.

Priručnik

Loading…

bigger parts into pieces.
21.Do not cover the ventilation holes in the housing while the machine is on.
22.Do not immerse the drive assembly in water, don't clean it under running water.
23.Do not clean the equipment while mounted on the machine's drive assembly.
24.Don't use aggressive detergents to clean the housing, as it may remove the
informational graphic symbols such as: scale, signs, safety marks,Etc.
25.Do not wash the metal parts in dishwashers. Aggressive cleaning agents used in
dishwashers cause the metal parts to turn black. Handwash the metal parts using
traditional washing-up liquid. Use soft brush.
26.Do not grind dry poppy seed. The poppy seed needs to be steamed and soaked before
grinding.
DEVICE DESCRIPTION
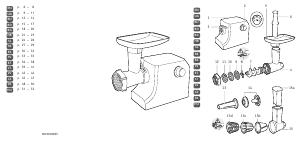
1. machine body 2. power switch (I) / reverse button ®
3. grinding chamber 4. tray
5. pusher 6. grinding chamber lock button
7. drive assembly head 8. screw
9. screw coupler 10. knife
11. 3 hole plates (3 mm, 5 mm, 7 mm) 12. nut
13. kibbeh attachment 14. sausage/butcher attachment
PREPARING MEAT GRINDER FOR OPERATION
Grinding assembly (fig 3)
In order to assembly the grounding chamber (3), insert the elements in following order:
- Screw (8)
- Knife (10) onto screw pin, with blades facing the hole plate
- Then one of hole plates (11), with the chamber protrusion matching the groove on the outside edge of the plate
- Gently tighten the assembly with the nut (12)
PREPARATION OF GRINDER
1.Place the machine body on even, hard surface, so that the ventilation holes are not covered, and close to power outlet
2.Before use wash the grinding chamber with all elements, tray (4) and pusher.
3.Check if the grinding chamber is complete. If not, assembly the chamber using all elements, according to figure 3.
4.Mount the assembled grinding part in the drive, so that the coupler (9) fits the drive head (7). Press in the grinding part, and rotate
counter clockwise until vertical. Audible click is heard when the assembly is mounted correctly. Tighten nut (12) on the grinding chamber
(3).
5.Mount the tray (4) on top of the grinding chamber.
DEVICE OPERATION
1.Turn the device on by pressing the upper part of button (2) – forward. Switch (15) is used to change the direction of rotation . Set
button ( 15) to position I.
2.Put the previously prepared products to be ground into grinding chamber, shoving them with the pusher (5).
3.If needed, you can turn on reverse rotations by pushing the lower part of button (2). Set button ( 15) to position II.
SAUSAGE ATTACHMENT
The attachment is used for in-house sausage production.
1.Assemble the set according to figure 4.
2.Soak the previously prepared intestine casings (called rounds) in warm water for about 30 minutes before stuffing.
3.Put the wet rounds on the outside of sausage attachment, gently slide down during stuffing, and wind for preferred length.
KIBBEH ATTACHMENT
1. Assemble the set according to figure 5.
2. Grind the meat 2-3 times until ypu get the desired consistency of meat.
CLEANING AND MAINTENANCE
1.Don't immerse grinder in water or other liquids.
2.Do not clean the casing using strong detergents in the form of emulsion, lotion, paste etc.
3.Clean the metal parts with soft brush.
4.Do not wash the metal parts in dishwashers. Strong cleaning agents used in dishwashers cause the metal parts to turn black.
Handwash the metal parts using traditional washing-up liquid.
5.Don't clean the equipment mounted on the machine's drive assembly.
TECHNICAL DATA
Permitted continuous operation time: 10 minutes
Break time before another use: 30 minutes
Device noise level Lwa: 77 dB
Supply voltage: 230V~50Hz
Power: 800W
Max. power:2000W
4
Preuzmite priručnik na hrvatskom jeziku (PDF, 6.06 MB)
(Čuvajte okoliš i ovaj priručnik ispišite samo ako je nužno)

Loading…

Ocjena

Ostavite ocjenu proizvoda Adler AD 4803 Stroj za mljevenje mesa i recite nam što mislite o njemu. Želite podijeliti svoje iskustvo s proizvodom ili postaviti pitanje? Ostavite komentar na dnu stranice.
Jeste li zadovoljni s Adler AD 4803 Stroj za mljevenje mesa?
Da Ne
Prvi ocijenite ovaj proizvod
0 glasovi

Pridružite se razgovoru o ovom proizvodu

Ovdje možete podijeliti što mislite o Adler AD 4803 Stroj za mljevenje mesa. Ako imate pitanja, prvo pažljivo pročitajte priručnik. Zahtjev za priručnik možete izvršiti putem našeg obrasca za kontakt.

Više o ovom priručniku

Razumijemo da je lijepo imati papirnati priručnik za svoj Adler AD 4803 Stroj za mljevenje mesa. Uvijek možete preuzeti priručnik s naše web stranice i sami ga ispisati. Ako želite imati originalni priručnik, preporučujemo da kontaktirate Adler. Oni bi mogli osigurati originalni priručnik. Tražite li priručnik za svoj Adler AD 4803 Stroj za mljevenje mesa na drugom jeziku? Odaberite željeni jezik na našoj početnoj stranici i potražite broj modela da vidite imamo li ga na raspolaganju.

Tehnički podaci

Marka Adler
Model AD 4803
Kategorija Strojevi za mljevenje mesa
Vrsta datoteke PDF
Veličina datoteke 6.06 MB

Svi priručnici za Adler Strojevi za mljevenje mesa
Više priručnika za Strojevi za mljevenje mesa

Često postavljana pitanja o Adler AD 4803 Stroj za mljevenje mesa

Naš tim za podršku pretražuje korisne informacije o proizvodu i odgovore na česta pitanja. Ako u častim pitanjima naiđete na netočne informacije, obratite nam se putem obrasca za kontakt.

Može li se mlin za meso koristiti i za druge predmete osim za meso? Potvrđeno

To ovisi o marki i modelu, ali neke brusilice za meso mogu se koristiti i za kuhano povrće, pasiranje rajčice ili za tijesto.

Ovo je bilo korisno (54) Čitaj više

Koliko mali moram rezati meso da bih ga mogao staviti u mlin za meso? Potvrđeno

To ovisi o stroju za mljevenje mesa, ali općenito meso treba rezati na trake duljine 10 cm i debljine 2 cm.

Ovo je bilo korisno (41) Čitaj više

Mogu li staviti smrznuto meso u mlin za meso? Potvrđeno

Ne, meso mora biti potpuno odmrznuto prije nego što se može unijeti u mlin za meso.

Ovo je bilo korisno (30) Čitaj više
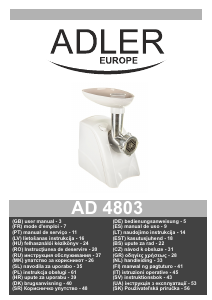
Priručnik Adler AD 4803 Stroj za mljevenje mesa

Povezani proizvodi

Povezane kategorije