
4
responsibility.
1) Before rst use
Remove any packaging material or promotional labels before rst use. Wash the chopper cover in warm, soapy water. Dry thoroughly.
NOTE: Take care when cleaning the blades, blades are sharp.
2) Parts
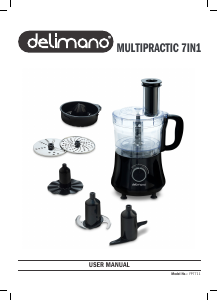
The Delimano Multipractic 7in1 contains the following parts for following functions:
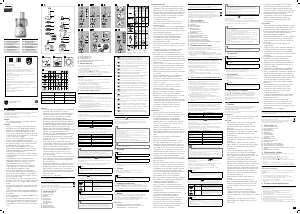
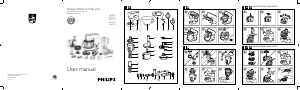
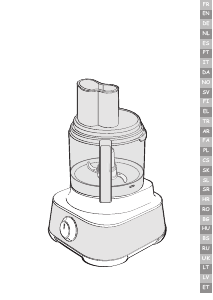
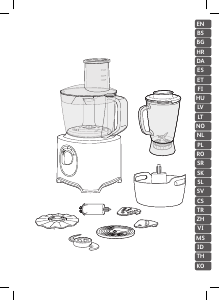
Pic. 1 (see: PICTURES, Pic. 1) Pic 2. (see: PICTURES, Pic. 2)
1. Main unit
2. Power and speed knob
3. Safety lock
4. Drive shaft
5. Bowl
6. Lid
7. Feed tube
8. Pushers (small and big)
9. Chopping blade
10. Dough maker
11A. Grinding disc
11b. Grating/slicing disks
12. Emulsier
13. Citrus juicer
d. Centre grip of the disc
e. Drive shaft
f. Small pusher
f+g. Big pusher
3) Usage
NOTE: For all steps described bellow, please refer to the picture 1 (see: PICTURES, Pic. 1).
1. Make sure that device is unplugged from power supply.
1. Insert the bottom part of the drive shaft (4) into the main unit (1).
2. Place the bowl (5) by aligning the arrow on the bowl with the “unlock” symbol on powerunit and x the bowl by rotating it counter clockwise to lock it.
3. Place a chosen attachment over the drive shaft.
NOTE: Always t the bowl and attachment onto the machine before adding ingredients.
4. Place the lid (6) on the bowl while ensuring the top of the drive shaft inserts in the centre of the lid. Hold the bowl and rotate the lid in counter clockwise direction to lock it.
NOTE: Do not use the lid’s auto shut-o feature to operate the processor. Always use the power and speed knob to switch the device ON or OFF.
5. Switch ON by selecting pulse or a speed.
Use the pulse “P” for short bursts. The pulse will operate for as long as the knob is held in position. Use pulse function continuously for maximum 5 seconds.
NOTE: The processor will not work if the bowl and lid are tted incorrectly.
6. Reverse the above procedure to remove the lid, attachments and bowl.
NOTES: Always switch the device OFF before removing the lid.
Your device is not suitable for crushing or grinding coee beans, or converting granulated sugar to caster sugar.
If adding almond essence or avouring to mixtures avoid contact with the plastic as this may result in permanent marking.
4) Using attachments
NOTE: For all steps described bellow, please refer to the picture 1 (see: PICTURES, Pic. 1).
Chopping blade (9):
The chopping blade is the most versatile of all the attachments. The length of the processing time will determine the texture achieved. For coarser textures use the pulse control. Use the knife
blade for cake and pastry making; chopping raw and cooked meat (without bones or cartilage!), vegetables, nuts, pate, dips, pureeing soups and to make crumbs from biscuits and bread.
Tips:
Choppingblade: Cut food such as meat, bread, vegetables into cubes approximately 2 cm before processing.
Biscuits should be broken into pieces and added down the feed tube whilst the machine is running.
When making pastry use fat straight from the fridge cut into 2cm cubes. Take care not to over-process.
Dough maker (10):
Use it for yeasted mixes.1. Place the dry ingredients in the bowl and add the liquid down the feed tube whilst the machine is running. Process until a smooth elastic ball of dough is formed
this will take aproximatly 30 s.
2. Re-knead by hand only. Re - kneading in the bowl is not recommended as it may cause the processor to become unstable.
Grinding and grating/slicing discs (11)
1. Use the grinding disc (A) for rm ingredients for salads, garnishes, casseroles, parmesan and stir fries (eg carrot, swede, courgette, cucumber).
2. Use the grating side of disc (B) for cheese, carrots, potatoes and foods of a similar texture.
3. Use the slicing side of disc (B) for cheese, carrots, potatoes, cabbage, cucumber, courgette, beetroot and onions.
Disc assembly:
Never remove the lld until the cutting disc has completely stopped. Handle the cutting discs with care - they are extremely sharp.
For all steps described bellow, please refer to the picture 2 (see: PICTURES, Pic. 2).
1. Place the drive shaft and bowl onto the main unit as described (see ‘’Usage’’).
2. Holding the disc by the centre grip (d) place the disc onto the drive shaft (e) with the “usable” side facing upwards (which is especially important if using grating/slicing disc).
3. Close and lock the lid securely.
4. Choose which size feed tube you want to use. The pusher contains a smaller feed tube (f) for processing individual items or thin ingredients.To use the small feed tube - rst put the large
pusher (g) inside the feed tube. To use the large feed tube - use both pushers together (f+g).
5. Put the food in the feed tube.
6. Switch on and push down evenly with the pusher.
NOTE: Never put your ngers in the feed tube.
Tips
•
Use fresh ingredients.
•
Do not cut food too small. Fill the width of the large feed tube mostly full. This prevents the food from slipping sideways during processing. Alternatively use the small feed tube.
•
When using the grinding disc, place ingredients horizontally.
•
When slicing or grating: food placed upright comes out shorter than food placed horizontally. There will always be a small amount of waste on the plate or in the bowl after processing.
Emulsier (12):
Use it for emulsifying (eggs, liquids, oil, making mayonnaise...)
1. Place the drive shaft and bowl onto the main unit as described (see ‘’Usage’’).
2. Place the emulsier into the bowl, add egg white and lock the lid.
3. Start mixing.
Citrus juicer (13):
Use it for squeezing oranges, limes, lemons and other citruses


Pridružite se razgovoru o ovom proizvodu
Ovdje možete podijeliti što mislite o Delimano FP7711 Procesor hrane. Ako imate pitanja, prvo pažljivo pročitajte priručnik. Zahtjev za priručnik možete izvršiti putem našeg obrasca za kontakt.