
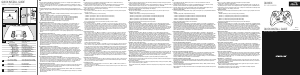
GET TO KNOW IT:
© 2016 Jöllenbeck GmbH. All rights reserved. SPEEDLINK, the SPEEDLINK word mark and
the SPEEDLINK swoosh are registered trademarks of Jöllenbeck GmbH. All trademarks
are the property of their respective owner. Jöllenbeck GmbH shall not be made liable for
any errors that may appear in this document. Information contained herein is subject to
change without prior notice. Please keep this information for later reference.
JÖLLENBECK GmbH, Kreuzberg 2, 27404 Weertzen, GERMANY
TECHNICAL SUPPORT
EN
Having technical problems with this product? Get in touch with our Support team –
the quickest way is via our website: www.speedlink.com
DE
Bei technischen Schwierigkeiten mit diesem Produkt wenden Sie sich bitte an unseren
Support, den Sie am schnellsten über unsere Webseite www.speedlink.com erreichen.
EN
1. Download and install the QUINOX Pro USB Gamepad driver. For the latest driver, go to:
www.speedlink.com/support.
2. Use the USB cable to connect the gamepad to any free port on your PC (USB 2.0/3.0, IN 5V DC 110mA). After a
few seconds, the LEDs will glow and ‘SPEEDLINK’ will appear in the display.
3. Use the On/O switch on the back of the gamepad to activate/deactivate the vibration function. The X/D switch
lets you switch between XInput (X) and DirectInput (D) mode.
4. Profile switching:
Press the left controller. Now press the up or down buttons on the D-pad to switch to the profile you want to
select.
- ‘NORMAL’ (default profile, no additional button functions)
- ‘PROFILE 1’ (button profile 1, additional buttons with custom button functions)
- ‘PROFILE 2’ (button profile 2, additional buttons with custom button functions)
- ‘MACRO 1’ (macro profile 1, additional buttons with macro functions)
- ‘MACRO 2’ (macro profile 2, additional buttons with macro functions)
To activate the selected profile, press the left controller again.
5. Customising the button profiles:
Press the left controller to select ‘PROFILE 1’ or ‘PROFILE 2’ without activating it. Press the right controller to
start programming mode. The display will show ‘PROGRAM MODE’. Press and hold one of the additional buttons
(K1-K6). The display will show the current button assignment for this profile. While keeping this additional
button held depressed, press the main button (e.g. ‘A’) whose function you want to assign to this additional
button. The new function will be shown in the display. Now release the additional button and press the right
controller again to exit programming mode for this profile. Now when you’re in this profile, the additional button
will be assigned this function (e.g. ‘A’).
6. Customising the macro profiles:
Press the left controller to select ‘MACRO 1’ or ‘MACRO 2’ without activating it. Press the right controller to start
programming mode. The display will show ‘PROGRAM MODE’. Press and hold one of the additional buttons (K1-
K6). The display will show the current button assignment for this profile. While keeping this additional button
held depressed, press any main button sequence (e.g. ‘A, X, B’) to assign this to the additional button. All main
buttons, D-pad commands and trigger presses can be saved as macros. Be aware that the trigger function
will be treated as a digital input. The new function will be shown as a ‘MACROSET’ in the display. Now release
the additional button and press the right controller again to exit programming mode for this profile. Now when
you’re in this profile, the additional button will be assigned this function (e.g. ‘A, X, B’).
7. Customising the analog trigger sensitivity:
Press the left controller to select ‘PROFILE 1’ or ‘PROFILE 2’ without activating it. Press the right controller to
start programming mode. The display will show ‘PROGRAM MODE’. When pressing the right analog trigger, the
display will show ‘R TRIGGER 100’; when pressing the left analog trigger it will show ‘L TRIGGER 100’. Customise
the sensitivity by pressing the up or down button on the D-pad: 25 (full trigger range active, maximum
sensitivity), 50, 75 or 100 (lowest sensitivity). Press the trigger button again to exit customisation mode. Press
the right controller again to exit programming mode.
8. Customising analog stick sensitivity:
When the display shows ‘SPEEDLINK’, move the left or right controller to the left or right. The display will show
‘0 0’: the left number indicates the sensitivity of the left analog stick; the right number indicates the sensitivity
of the right analog stick. Move the relevant controller to the left or right to increase/decrease sensitivity (-10:
minimum sensitivity/+10: maximum sensitivity). Customisation mode will exit automatically after 2 seconds.
9. Activating/deactivating LED illumination:
Press the right controller. The display will show ‘LEDS ON’ or ‘LEDS OFF’. Switch between the two by pressing
the up or down button on the D-pad. Confirm the change by pressing the right controller again.
10. Resetting the gamepad:
To reset the gamepad back to its factory settings, press and hold both the ‘BACK’ and ‘START’ buttons for 3
seconds. The display will show: ‘RESET?’. To confirm, press ‘A’. All settings will then be deleted. To cancel, press
the right controller.
DE
1. Laden Sie den Treiber für das QUINOX Pro USB Gamepad herunter und installieren Sie diesen. Der aktuelle
Treiber steht unter www.speedlink.com/support zum Download bereit.
2. Verbinden Sie das Gamepad über das USB-Kabel mit einem freien USB-Anschluss Ihres PCs (USB 2.0/3.0, IN 5V
DC 110 mA). Nach einigen Sekunden beginnen die LEDs zu leuchten, das Display zeigt „SPEEDLINK“.
3. Mit dem On/O-Schalter auf der Unterseite des Gamepads aktivieren oder deaktivieren Sie die
Vibrationsfunktion. Mit dem X/D-Schalter kann zwischen den Modi XInput (X) und DirectInput (D) gewechselt
werden.
4. Wechsel zwischen Profilen:
Drücken Sie den linken Regler. Wechseln Sie dann mit der Hoch- oder Runter-Taste des D-Pads zu dem Profil,
das Sie auswählen möchten.
- „NORMAL“ (Standardprofil, keine Zusatztastenfunktionen)
- „PROFILE 1“ (Tastenprofil 1, Zusatztasten mit beliebigen Tastenfunktionen)
- „PROFILE 2“ (Tastenprofil 2, Zusatztasten mit beliebigen Tastenfunktionen)
- „MACRO 1“ (Makroprofil 1, Zusatztasten mit Makrofunktionen)
- „MACRO 2“ (Makroprofil 2, Zusatztasten mit Makrofunktionen)
Zur Aktivierung des gewählten Profils drücken Sie bitte erneut den linken Regler.
5. Tastenprofile einstellen:
Drücken Sie den linken Regler, um „PROFILE 1“ oder „PROFILE 2“ auswählen, ohne diesen zu aktivieren.
Drücken Sie den rechten Regler, um den Programmier-Modus zu starten. Das Display zeigt „PROGRAM MODE“.
Halten Sie eine der Zusatztasten (K1-K6) gedrückt. Das Display zeigt die gegenwärtige Belegung dieser Taste in
diesem Profil an. Währenddessen drücken Sie eine beliebige Haupttaste (z. B. „A“), um deren Funktion auf die
gewählte Zusatztaste zu legen. Die neue Funktion wird über das Display angezeigt. Lassen Sie abschließend
die Zusatztaste los und drücken Sie den rechten Regler erneut, um den Programmier-Modus für dieses Profil
zu verlassen. Innerhalb dieses Profils ist die Zusatztaste künftig entsprechend belegt (z. B. mit „A“ auf der
Zusatztaste).
6. Makroprofile einstellen:
Drücken Sie den linken Regler, um „MACRO 1“ oder „MACRO 2“ auswählen, ohne diesen zu aktivieren. Drücken
Sie den rechten Regler, um den Programmier-Modus zu starten. Das Display zeigt „PROGRAM MODE“. Halten
Sie eine der Zusatztasten (K1-K6) gedrückt. Das Display zeigt die gegenwärtige Belegung dieser Taste in
diesem Profil an. Währenddessen drücken Sie eine beliebige Haupttastenfolge (z. B. „A, X, B“), um diese auf die
gewählte Zusatztaste zu legen. Alle Haupttasten, D-Pad-Befehle und Trigger-Betätigungen lassen sich als Makro
speichern. Bitte beachten Sie, dass die Trigger-Funktion digital verarbeitet wird. Die neue Funktion zeigt das
Display als „MACROSET“ an. Lassen Sie abschließend die Zusatztaste los und drücken Sie den rechten Regler
erneut, um den Programmier-Modus für dieses Profil zu verlassen. Innerhalb dieses Profils ist die Zusatztaste
künftig entsprechend belegt (z. B. mit dem Haupttastenfolge „A, X, B“ auf der Zusatztaste).
7. Analog-Trigger-Empfindlichkeit einstellen:
Drücken Sie den linken Regler, um „PROFILE 1“ oder „PROFILE 2“ auswählen, ohne diesen zu aktivieren.
Drücken Sie den rechten Regler, um den Programmier-Modus zu starten. Das Display zeigt „PROGRAM MODE“.
Beim Betätigen des rechten Analog-Triggers zeigt das Display „R TRIGGER 100“, beim Betätigen des linken
Analog-Triggers „L TRIGGER 100“. Durch Betätigen der Hoch- oder Runter-Taste des D-Pads stellen Sie die
Empfindlichkeit ein: 25 (vollständiger Trigger-Bereich aktiv, höchste Empfindlichkeit), 50, 75 oder 100 (geringste
Empfindlichkeit). Betätigen Sie den Trigger erneut, um den Einstellmodus zu beenden. Drücken Sie den rechten
Regler erneut, um den Programmier-Modus zu verlassen.
8. Analogstick-Empfindlichkeit einstellen:
Bewegen Sie, während das Display „SPEEDLINK“ zeigt, den linken oder rechten Regler nach links oder rechts.
Das Display zeigt „0 0“: Die linke Zahl zeigt die Empfindlichkeit des Linken an, die Rechte die des rechten
Analogsticks. Bewegen Sie den gewünschten Regler nach links oder rechts, um eine höhere/niedrigere
Empfindlichkeit einzustellen [Regelbereich -10 (minimale Empfindlichkeit) bis +10 (maximale Empfindlichkeit)].
Der Einstellmodus wird nach 2 Sekunden automatisch beendet.
9. Beleuchtung aktivieren/deaktivieren:
Drücken Sie den rechten Regler. Das Display zeigt „LEDS ON“ (Licht an) oder „LEDS OFF“ (aus). Durch Betätigen
der Hoch- oder Runter-Taste des D-Pads wechseln Sie Ihre bevorzugte Einstellung. Bestätigen Sie die Änderung
durch einen erneuten Druck auf den rechten Regler.
10. Einstellungen zurücksetzen:
Um das Gamepad auf die Werkseinstellungen zurückzusetzen, halten Sie „BACK“ und „START“ zusammen für
3 s gedrückt. Das Display zeigt: „RESET?“
Drücken Sie zum Bestätigen „A“. Alle Einstellungen werden daraufhin gelöscht. Um den Vorgang abzubrechen,
drücken Sie den rechten Regler.
IT
1. Scaricare e installare il driver per il gamepad QUINOX Pro USB. Il driver attuale può essere scaricato su
www.speedlink.com/support.
2. Collegare il gamepad con il cavo USB a una porta USB libera del PC (USB 2.0/3.0, IN 5V DC 110 mA). Dopo alcuni
secondi si accendono i LED, il display mostra "SPEEDLINK".
3. Per attivare o disattivare la funzione di vibrazione azionare l'interruttore On/O sul lato inferiore del gamepad.
L'azionamento dell'interruttore X/D permette di passare dalla modalità XInput (X) alla modalità DirectInput (D) e
viceversa.
4. Cambiare profili:
Premere il regolatore sinistro. Con il tasto Su e Giù del D-pad passare quindi al profilo che si vuole selezionare.
- „NORMAL“ (profilo standard, nessuna funzione di tasti aggiuntivi)
- „PROFILE 1“ (profilo tasti 1, tasti aggiuntivi con funzioni dei tasti a scelta)
- „PROFILE 2“ (profilo tasti 2, tasti aggiuntivi con funzioni dei tasti a scelta)
- „MACRO 1“ (profilo macro 1, tasti aggiuntivi con funzioni macro)
- „MACRO 2“ (profilo macro 2, tasti aggiuntivi con funzioni macro)
Per attivare il profilo selezionato premere nuovamente il regolatore sinistro.
5. Impostare i profili tasti:
premere il regolatore sinistro per selezionare „PROFILE 1“ o „PROFILE 2“ senza attivarlo. Premere il regolatore
destro per avviare la modalità di programmazione. Il display mostra „PROGRAM MODE“. Tenere premuto uno
dei tasti aggiuntivi (K1-K6). Il display mostra la configurazione attuale del rispettivo tasto in questo profilo. Nel
frattempo premere un qualsiasi tasto principale (ad esempio „A“) per assegnare la rispettiva funzione al tasto
aggiuntivo selezionato. La nuova funzione viene visualizzata sul display. Infine rilasciare il tasto aggiuntivo
e premere nuovamente il regolatore destro per uscire dalla modalità di programmazione per questo profilo.
All'interno di questo profilo il tasto aggiuntivo sarà configurato in questo modo (ad. es con „A“ sul tasto
aggiuntivo).
6. Impostare i profili macro:
premere il regolatore sinistro per selezionare „MACRO 1“ o „MACRO 2“ senza attivarlo. Premere il regolatore
destro per avviare la modalità di programmazione. Il display mostra „PROGRAM MODE“. Tenere premuto uno
dei tasti aggiuntivi (K1-K6). Il display mostra la configurazione attuale del rispettivo tasto in questo profilo.
Nel frattempo premere una sequenza di tasti principali a piacere (ad es. „A, X, B“) per assegnarla al tasto
aggiuntivo selezionato. Tutti i tasti principali, i comandi D-pad e le conferme trigger sono memorizzabili come
macro. Si precisa che la funzione trigger viene elaborata in modo digitale. La nuova funzione viene mostrata sul
display come „MACROSET“. Infine rilasciare il tasto aggiuntivo e premere nuovamente il regolatore destro per
uscire dalla modalità di programmazione per questo profilo. All'interno di questo profilo il tasto aggiuntivo sarà
configurato in questo modo (ad. es con la sequenza dei tasti principali „A, X, B“ sul tasto aggiuntivo).
7. Impostare la sensibilità del trigger analogico:
Premere il regolatore sinistro per selezionare „PROFILE 1“ o „PROFILE 2“ senza attivarlo. Premere il regolatore
destro per avviare la modalità di programmazione. Il display mostra „PROGRAM MODE“. Azionando il trigger
analogico destro, il display mostra „R TRIGGER 100“, azionando il trigger analogico sinistro „L TRIGGER 100“.
Azionando il tasto Su e Giù del D-pad si regola la sensibilità: 25 (campo completo del trigger attivo, massima
sensibilità), 50, 75 o 100 (sensibilità minima). Azionare nuovamente il trigger per terminare la modalità di
configurazione. Premere il regolatore destro per uscire dalla modalità di programmazione.
8. Impostare la sensibilità dello stick analogico:
Mentre sul display viene visualizzato „SPEEDLINK“, spostare il regolatore sinistro o destro verso sinistra
o destra. Il display mostra „0 0“: il numero a sinistra indica la sensibilità dello stick analogico sinistro, il
destro quella dello stick destro. Spostare il regolatore a sinistra o a destra per impostare una sensibilità
maggiore/inferiore (10: sensibilità minima / +10: sensibilità massima). La modalità di impostazione termina
automaticamente dopo 2 secondi.
9. Attivare/Disattivare l'illuminazione:
premere il regolatore destro. Il display mostra „LEDS ON“ (luci accese) o „LEDS OFF“ (spente). Azionando il
tasto Su o Giù del D-pad si passa all'impostazione preferita. Confermare la modifica azionando nuovamente il
regolatore destro.
10. Ripristinare le impostazioni:
per ripristinare le impostazioni di default del gamepad, tenere premuto „BACK“ e „START“ per almeno 3
secondi. Il display mostra: „RESET?“
Premere „A“ per confermare. Tutte le impostazioni saranno cancellate. Per interrompere la procedura premere il
regolatore destro.
FR
1. Téléchargez le pilote de la manette QUINOX Pro USB Gamepad et installez-le. Vous trouverez la version actuelle
du pilote à l’adresse www.speedlink.com/support.
2. À l’aide du câble USB, reliez la manette à une prise USB libre sur votre PC (prise USB 2.0/3.0, IN 5 V CC, 110
mA). Au bout de quelques secondes, les voyants s’allument et « SPEEDLINK » s’ache sur l’écran.
3. L’interrupteur Marche/Arrêt sur la face inférieure de la manette active et désactive les vibrations. L’interrupteur
X/D permet de basculer entre les modes XInput (X) et DirectInput (D).
4. Pour passer d’un profil à l’autre :
Appuyez sur la molette de gauche. Pour activer le profil de votre choix, utilisez la touche Haut ou Bas du pavé
directionnel.
- « NORMAL » (profil standard, touches supplémentaires sans fonction)
- « PROFILE 1 » (profil d’aectation 1, touches supplémentaires aectées à des fonctions au choix)
- « PROFILE 2 » (profil d’aectation 2, touches supplémentaires aectées à des fonctions au choix)
- « MACRO 1 » (profil de macros 1, touches supplémentaires aectées à des fonctions macros)
- « MACRO 2 » (profil de macros 2, touches supplémentaires aectées à des fonctions macros)
Pour activer le profil sélectionné, appuyez à nouveau sur la molette de gauche.
5. Paramétrage des profils d’aectation de touches :
Appuyez sur la molette de gauche pour sélectionner « PROFILE 1 » ou « PROFILE 2 » sans activer le profil en
question. Appuyez sur la molette de droite pour lancer le mode de programmation. L’écran indique « PROGRAM
MODE ». Maintenez l’une des touches supplémentaires (K1-K6) enfoncée. L’écran indique l’aectation actuelle
de cette touche dans le profil en question. Sans relâcher la touche, appuyez sur un bouton principal de votre
choix (par exemple « A ») pour attribuer sa fonction à la touche supplémentaire sélectionnée. La nouvelle
fonction s’ache alors à l’écran. Relâchez la touche supplémentaire et appuyez à nouveau sur la molette
de droite pour quitter le mode de programmation pour ce profil. Au sein du profil en question, la touche
supplémentaire aura désormais l’aectation définie (par exemple fonction « A »).
6. Paramétrage des profils de macros :
Appuyez sur la molette de gauche pour sélectionner « MACRO 1 » ou « MACRO 2 » sans activer le profil en
question. Appuyez sur la molette de droite pour lancer le mode de programmation. L’écran indique « PROGRAM
MODE ». Maintenez l’une des touches supplémentaires (K1-K6) enfoncée. L’écran indique l’aectation actuelle
de cette touche dans le profil en question. Sans relâcher la touche, appuyez sur une séquence de boutons
principaux de votre choix (par exemple « A, X, B ») pour attribuer cette séquence à la touche supplémentaire
sélectionnée. Tous les boutons principaux, les commandes du pavé directionnel et les actionnements de
gâchettes peuvent être utilisés pour l’enregistrement de macros. À noter que la fonction gâchette est traitée de
manière numérique. La nouvelle fonction est indiquée à l’écran sous l’appellation « MACROSET ». Relâchez la
touche supplémentaire et appuyez à nouveau sur la molette de droite pour quitter le mode de programmation
pour ce profil. Au sein du profil en question, la touche supplémentaire aura désormais l’aectation définie (par
exemple la séquence de boutons principaux « A, X, B »).
7. Réglage de la sensibilité des gâchettes analogiques :
Appuyez sur la molette de gauche pour sélectionner « PROFILE 1 » ou « PROFILE 2 » sans activer le profil en
question. Appuyez sur la molette de droite pour lancer le mode de programmation. « PROGRAM MODE » s’ache
à l’écran. L’achage indique « R TRIGGER 100 » lorsque vous actionnez la gâchette analogique de droite et « L
TRIGGER 100 » lorsque vous actionnez la gâchette analogique de gauche. Pour régler la sensibilité, actionnez
la touche Haut ou Bas du pavé directionnel. Vous disposez des niveaux de sensibilité suivants : 25 (plage de la
gâchette intégralement activée, sensibilité maximale), 50, 75 ou 100 (sensibilité minimale). Appuyez à nouveau
sur la gâchette pour quitter le mode de réglage. Appuyez à nouveau sur la molette de droite pour quitter le
mode de programmation.
8. Réglage de la sensibilité des sticks analogiques :
Tandis que l’écran indique « SPEEDLINK », bougez la molette de gauche ou de droite vers la gauche ou vers la
droite. L’écran indique « 0-0 » : le chire de gauche correspond à la sensibilité du stick analogique de gauche et
le chire de droite à la sensibilité du stick analogique de droite. Bougez la molette souhaitée vers la gauche ou
vers la droite afin de sélectionner une sensibilité supérieure/inférieure (sensibilité minimale : -10 / sensibilité
maximale : +10). Le mode de réglage est désactivé automatiquement au bout de 2 secondes.
9. Activation et désactivation de l’éclairage :
Appuyez sur la molette de droite. L’écran indique « LEDS ON » (éclairage activé) ou « LEDS OFF » (éclairage
désactivé). Actionnez la touche Haut ou Bas du pavé directionnel pour sélectionner le réglage de votre choix.
Appuyez à nouveau sur la molette de droite pour confirmer le changement eectué.
10. Réinitialisation des réglages :
Pour ramener la manette aux réglages par défaut, maintenez les touches « BACK » et « START » enfoncées
simultanément durant 3 secondes. L’écran indique : « RESET? »
Appuyez sur le bouton « A » pour confirmer. Tous les réglages sont alors eacés. Pour interrompre l’opération,
appuyez sur la molette de droite.
ES
1. Descarga el controlador para QUINOX Pro USB Gamepad e instálalo. El controlador actual está disponible para
descargar en www.speedlink.com/support.
2. Conecta el gamepad con el cable USB a un conector USB libre de tu PC (USB 2.0/3.0, IN 5V DC 110mA). Después
de algunos segundos, los LED empiezan a iluminarse y en el display aparece "SPEEDLINK".
3. Con la tecla On/O de la parte inferior del gamepad puede activar o desactivar la función de vibración. Con el
botón X/D puede cambiar de modalidad entre el XInput (X) y el DirectInput (D).
4. Cambio entre perfiles:
Pulsa el regulador de la izquierda. Con el botón hacia arriba o hacia abajo del D-Pad puedes cambiar al perfil
que quieras utilizar.
- "NORMAL" (perfil estándar, sin funciones adicionales en este botón)
- "PROFILE 1" (perfil de botón 1, botones adicionales con las funciones que elijas)
- "PROFILE 2" (perfil de botón 2, botones adicionales con las funciones que elijas)
- "MACRO 1" (perfil de macro 1, botones adicionales con funciones macro)
- "MACRO 2" (perfil de macro 2, botones adicionales con funciones macro)
Para activar el perfil elegido, pulsa una vez más el regulador de la izquierda.
5. Ajuste del perfil de botones:
Presiona el regulador de la izquierda para seleccionar "PROFILE 1” o "PROFILE 2" sin desactivarlo. Pulsa el
regulador de la derecha para iniciar el modo de programación. El display muestra "PROGRAM MODE". Mantén
pulsado uno de los botones adicionales (K1-K6). El display muestra la asignación actual de este botón para
este perfil. Mientras, presiona cualquier botón (p. ej. "A") para configurar su función para el botón adicional
seleccionado. La nueva función se indica en el display. Suelta el botón adicional y pulsa el regulador de la
derecha una vez más para salir del modo de programación de este perfil. En este perfil, el botón adicional
quedará asignado de forma correspondiente (p. ej., "A" para el botón adicional).
6. Ajuste del perfil de macro:
Pulsa el regulador de la izquierda para seleccionar "MACRO 1” o "MACRO 2" sin desactivarlo. Pulsa el regulador
de la derecha para iniciar el modo de programación. El display muestra "PROGRAM MODE". Mantén pulsado
uno de los botones adicionales (K1-K6). El display muestra la asignación actual de este botón para este perfil.
Mientras, pulsa cualquier secuencia de botones principales (p. ej. "A, X, B") para configurarla para el botón
adicional seleccionado. Todos los botones principales, órdenes del D-Pad y pulsaciones de disparo pueden ser
guardados como macro. Ten en cuenta que la función disparo es operada de forma digital. La nueva función se
muestra en el display como "MACROSET". Suelta el botón adicional y pulsa el regulador de la derecha una vez
más para salir del modo de programación de este perfil. En este perfil, el botón adicional quedará asignado de
forma correspondiente (p. ej., con la secuencia de botones principales "A, X, B" para el botón adicional).
7. Ajuste de la sensibilidad de disparo analógico:
Presiona el regulador de la izquierda para seleccionar "PROFILE 1” o "PROFILE 2" sin desactivarlo. Pulsa el
regulador de la derecha para iniciar el modo de programación. El display muestra "PROGRAM MODE". Al pulsar
el gatillo analógico derecho el display muestra "R TRIGGER 100"; al pulsar el izquierdo "L TRIGGER 100".
Pulsando el botón hacia arriba o hacia abajo del D-Pad se ajusta la sensibilidad: 25 (área del gatillo completa
activa, máxima sensibilidad), 50, 75 o 100 (sensibilidad mínima). Pulsa el gatillo nuevamente para salir del
modo de ajuste. Pulsa otra vez el regulador de la derecha para salir el modo de programación.
8. Ajuste de la sensibilidad de disparo analógico:
Mueve el regulador de la derecha o de la izquierda hacia la derecha o la izquierda mientras en el display
aparece "SPEEDLINK". El display muestra "0 0": El número de la izquierda muestra la sensibilidad de la
izquierda y el de la derecha la del stick analógico de la derecha. Mueve el regulador deseado para la izquierda
o la derecha para ajustar la sensibilidad superior/inferior (-10: sensibilidad mínima / +10: sensibilidad máxima).
El modo de ajuste se apaga automáticamente a los 2 segundos.
9. Activar/desactivar la iluminación:
Pulsa el regulador de la derecha. En el display se muestra "LEDS ON" (luz encendida) o "LEDS OFF" (apagada).
Pulsando el botón hacia arriba o hacia abajo del D-Pad se cambia el ajuste preferente. Confirma el cambio
pulsando una vez más el regulador de la derecha.
10. Restaurar las configuraciones:
Para restablecer los valores de configuración de fábrica del gamepad, mantén pulsados "BACK" y "START" al
mismo tiempo por 3 s. El display muestra: "RESET?"
Pulsa para confirmar "A". Todas las configuraciones serán eliminadas. Para interrumpir el proceso, pulsa el
regulador derecho.
QUINOX
SL-650005-BK
AIRROW Flightstick
Secure the advantage in the battle for air superiority. The AIRROW Flightstick turns your
desktop into your own cockpit in a flash. 29 button functions and eight-way panning
make the AIRROW the benchmark which all other flightsticks must measure up to.
Part of this success is thanks to the hall eect which measures magnetic fields.
The advantages: the contactless sensors are much more durable and oer greater
precision than standard joysticks.
3
BUTTON/DISPLAY ACTION
Left controller Start profile selection
D-Pad up/down Select profile
Display: NORMAL Normal profile
Display: PROFILE 1/2 Button profile 1/2
Right controller Enter button program mode
K1-K6 + button Assign button function to K1-K6
Right controller Leave button program mode
Left/right trigger Enter left/right trigger settings
D-Pad up/down Select trigger sensitivity
Left/right trigger Leave left/right trigger settings
Display: MACRO 1/2 Macro profile 1/2
Right controller Enter macro program mode
K1-K6 + macro Assign button macro to K1-K6
Right controller Leave macro program mode
Left controller End profile selection/activate profile
Left controller left/right Change left analog stick sensitivity
Right controller left/right Change right analog stick sensitivity
Right controller Enter light settings
D-Pad up/down Turn button light on/o
Right controller Leave light settings
11 BACK + START (press 3s) Reset settings
A Confirm reset
Right controller Cancel reset
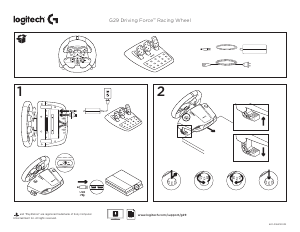
QUICK INSTALL GUIDE
QUINOX – PRO USB GAMEPAD
http://www.speedlink.com/support
DOWNLOAD
1
4-7
8
9
10
2


Pridružite se razgovoru o ovom proizvodu
Ovdje možete podijeliti što mislite o Speedlink SL-650005-BK Kontroler za igru. Ako imate pitanja, prvo pažljivo pročitajte priručnik. Zahtjev za priručnik možete izvršiti putem našeg obrasca za kontakt.