Priručnik Electrolux PD91-4MG Usisavač

Trebate priručnik za svoj Electrolux PD91-4MG Usisavač? U nastavku možete pogledati i besplatno preuzeti PDF priručnik na hrvatskom jeziku. Ovaj proizvod trenutno ima 10 često postavljanih pitanja, 0 komentara i ima 0 glasova. Ako ovo nije priručnik koji želite, kontaktirajte nas.

Vaš je proizvod neispravan i priručnik ne nudi rješenja? Otvorite Repair Café za besplatne usluge popravka.
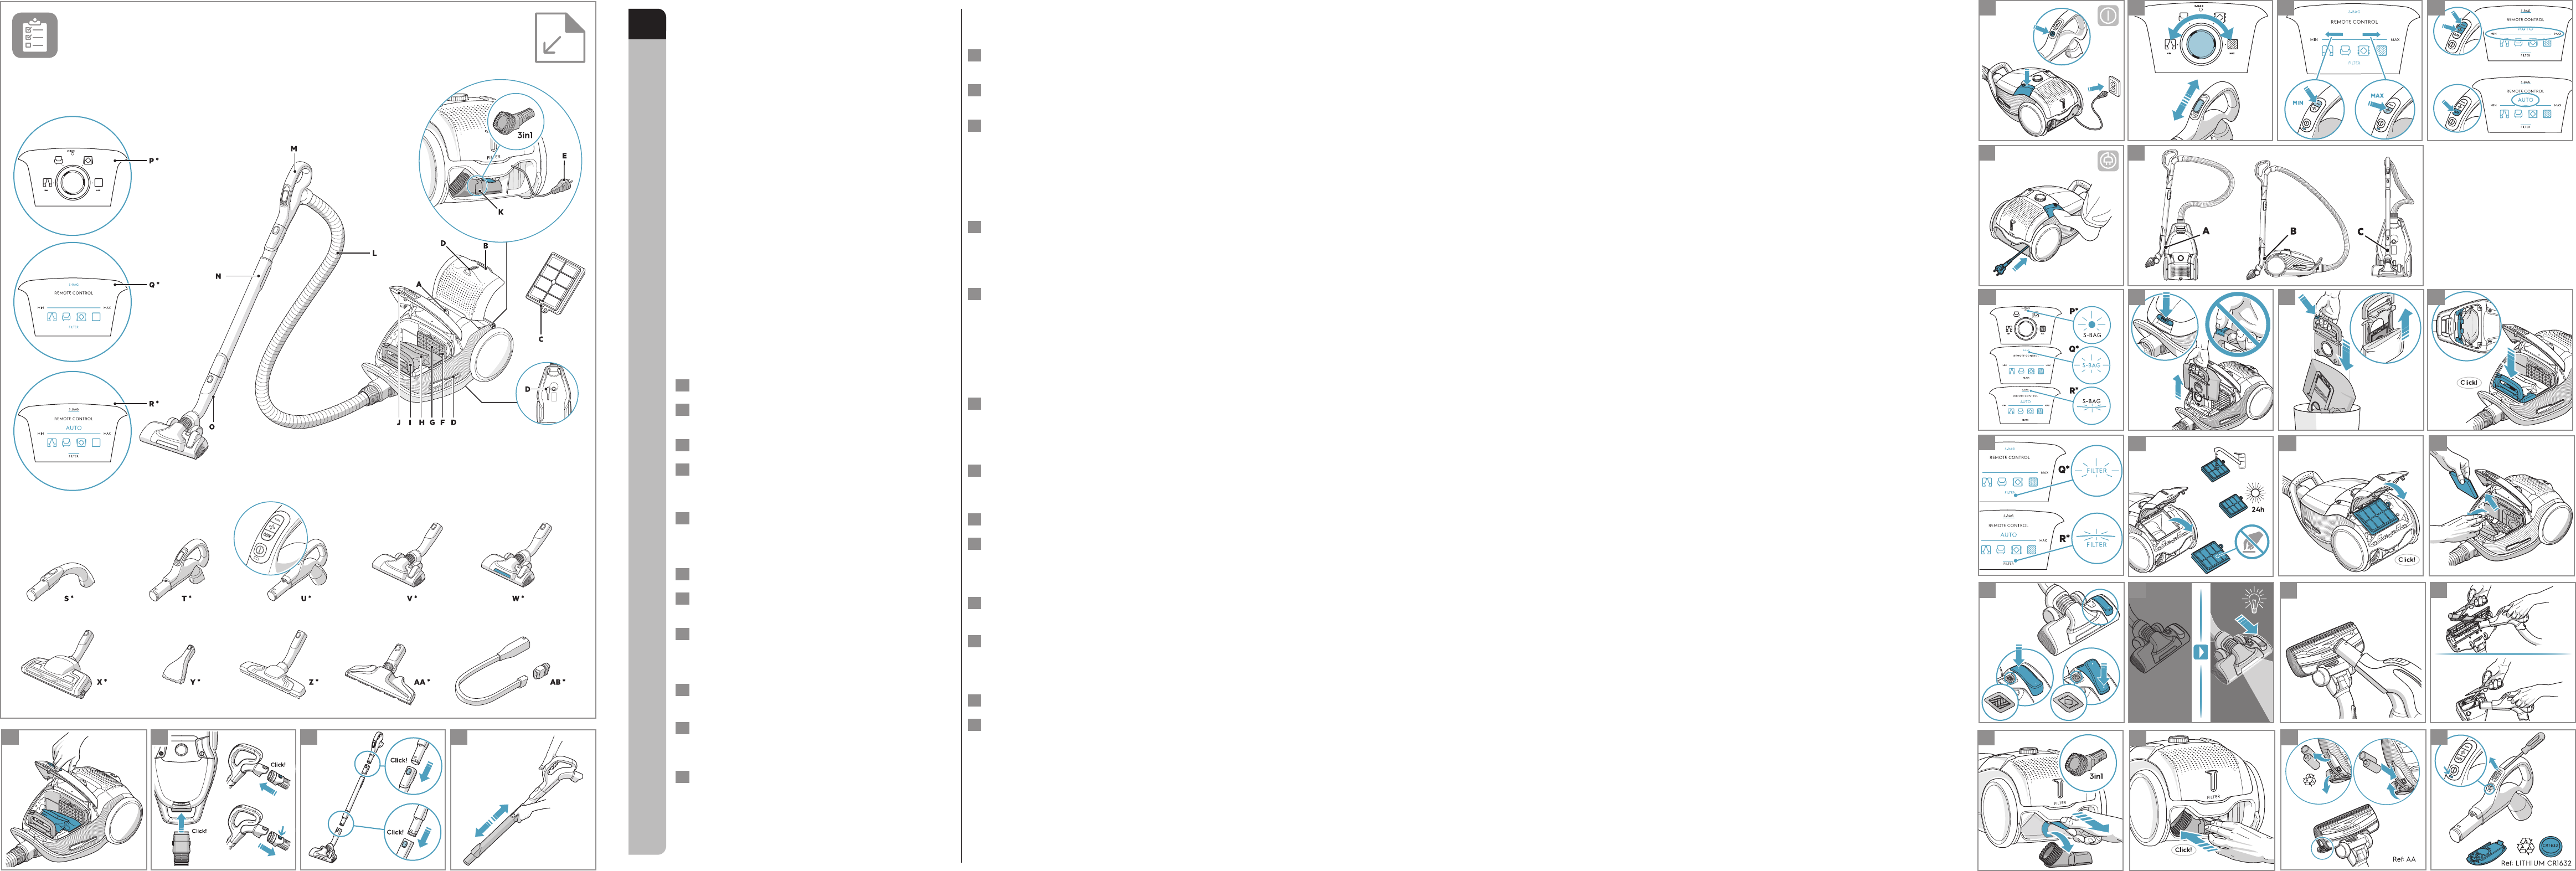
Priručnik

Loading…

1 32 4
2www.electrolux.com
13 14
17
16 18
5 876
9
1211
2625
19 20
22
21
15
10
23
24
3www.electrolux.com
ENGLISH
Thank you for choosing Electrolux PURED9 vacuum cleaner. Always
use original accessories and spare parts to get the best results. This
product is designed with the environment in mind. All plastic parts are
marked for recycling purposes.
BEFORE STARTING
• Read this manual carefully.
• Check that all parts described are included.
• Pay special attention to the safety precautions!
DESCRIPTION OF PURED9 VACUUM CLEANER
A. Display (see versions later)
B. Exhaust lter lid
C. Exhaust lter
D. Parking slots
E. Power cord
F. Motor lter
G. Motor lter holder
H. S-bag®
I. S-bag® holder
J. Dust compartment cover
K. AeroPro 3in1 tool
L. AeroPro hose
M. AeroPro handle (see versions
later)
N. AeroPro telescopic tube
O. Parking clip
P. Display for models with rotary
knob manual control*
Q. Display for models with remote
control*
R. Display for models with remote
control and AUTO function*
S. AeroPro Classic handle*
T. AeroPro Ergo handle*
U. AeroPro Remote Control
handle*
V. AeroPro FlowMotion nozzle*
W. AeroPro PureVision nozzle
(with front lights)*
X. AeroPro Turbo nozzle*
Y. AeroPro Mini Turbo nozzle*
Z. ParkettoPro nozzle*
AA. AeroPro FlexProPlus nozzle*
AB. AeroPro Long crevice nozzle*
* Certain models only
HOW TO USE THE VACUUM CLEANER
1 Open the dust compartment cover by pulling the S-BAG button. Check
that the dust bag (s-bag) is in place.
2 Insert the hose into the cleaner (to remove it, press the lock buttons
and pull). Insert the hose into the hose handle until the lock button
clicks (to release it, press the lock button
and pull).
3 Attach the telescopic tube to the nozzle. Attach the telescopic tube to
the hose handle (to remove it, press the lock button and pull).
4 Adjust the telescopic tube by holding the lock with one hand and
pulling the handle with the other hand.
START/STOP THE VACUUM CLEANER AND ADJUST SUCTION POWER
5 Pull out the power cord and plug it into the mains. Press the ON/
OFF button to turn the cleaner on/o. Indicators light up, MIN/MAX
indicator lights up from left to right and back (auto function models).*
Models with remote control can also be operated by the ON/OFF
button on the handle.*
6 Adjust suction power (manual control models): Turn the rotary knob on
the cleaner or use the air valve on the handle.*
7 Adjust suction power (remote control models): Press +/- button on the
handle. MIN/MAX and symbols indicators on display will show level of
power.*
8 Adjust suction power (remote control models with AUTO): The cleaner
starts in AUTO mode (automatic power regulation). AUTO indicator is
illuminated on the display and MIN/MAX indicator pulses. To regulate
power manually press +/- button on handle. Press AUTO button to
return to auto-function.*
9 After cleaning, push the REWIND button to rewind the cable.
PARKING POSITIONS
10 Use parking position on the side (A) or underneath (C) to carry and
store the cleaner. At the back (B) when you pause (save your back).
REPLACING THE DUSTBAG, SBA
11 Replace the s-bag when
- P* Models with rotary knob: S-BAG indicator lights up in red
- Q* Models with remote control: S-BAG symbol lights up red.
- R* Models with remote control and AUTO: S-BAG indicator lights up
in red (green light: bag is OK, yellow light: soon time to replace bag).
NB: Always change the s-bag when S-BAG indicator is illuminated or
has red light even if the s-bag is not full (it may be blocked) and after
using carpet cleaning powder. For best possible performance, use the
Ultra Long Performance bag which is especially developed for your
cleaner. Other synthetic s-bags can also be used. Do not use paper dust
bags! www.s-bag.com
12 Pull the S-BAG button to open the dust compartment. The handle of
the s-bag holder goes up. Pull the handle to remove the s-bag with
holder. Do not press the release button.
13 Hold the s-bag with holder over a dust bin. Press the button to release
the s-bag. Insert a new s-bag to the holder by inserting the cardboard
at the back of the holder.
14 Insert the s-bag with holder by pushing it straight down in its tracks.
Make sure the s-bag is not stuck under the holder. Close the lid. If the
s-bag is not properly placed or is missing, the lid will not close.
NB: When you start the cleaner after s-bag replacement, It takes 10
seconds before the S-BAG indicator turns o (P* Models with rotary
knob and Q* Models with remote control) or turns green (R* Models
with remote control and AUTO).
REPLACING THE FILTERS
15 Replace/clean** the lter when (**washable lter only)
- P* Models with rotary knob: you have changed the s-bag 5 times
- Q* Models with remote control: FILTER symbol lights up in red
- R* Models with remote control and AUTO: lter indicator lights up
in red. Green light indicates that the lter is ok. It lights up briey when
you start the vacuum cleaner.
16 Pull the FILTER button to open the lter lid. Use original s-lters.
Remove the lter and check the reference on the frame to dene type.
Replace with a new lter or clean it**. Rinse the inside (dirty side) in
lukewarm tap water. Tap the lter frame to remove the water. Repeat
the process four times. (*
*washable lter only)
NB: Do not use cleaning agents. Avoid touching the lter surface.
Let the lter dry completely (min. 24 h in room temperature) before
putting back ! Change the washable lter at least once a year or when it
is very dirty or damaged. Do not remove the L-shaped foam under the
lter.
17 After replacing the lter, close the lter lid until it is clicked back into
place. If the lter lid comes o, position the hinges at the bottom and
push the lter lid until it is clicked back into place.
NB: When you start the cleaner after lter replacement, It takes 10
seconds before the FILTER indicator turns green (models with remote
control and AUTO function) or turns o (remote control models).*
18 Replace the motor lter when dirty or after every 5th s-bag. Push the
lter holder down and pull it out. Exchange the lter and close the lid.
VACUUMING WITH THE UNIVERSAL NOZZLE V*, W*
19 Change nozzle setting with the pedal. Icon illustrates recommended
oor type.
20 PureVision nozzle*: Move the nozzle forward. The front light turns on
automatically after a few seconds. When the nozzle is not used, the
light turns o automatically after a few seconds.
CLEANING THE UNIVERSAL NOZZLE V*, W**
21 Disconnect the nozzle from the tube. Clean with the hose handle.
CLEANING THE TURBO NOZZLE X*
22 Disconnect the nozzle from the tube and remove entangled threads etc
by snipping them away with scissors. Use the hose handle to clean the
nozzle. *
3IN1 ACCESSORY TOOL
23 Pull the textile tab to take out 3in1 tool. The tool has 3functions, see
pictures on next page.
24 After usage, put it back in its place.
2www.electrolux.com
GB
FR
AR
BG
GR
NO
CZ
HR
PL
DE
HU
PT
DK
IT
RO
EE
LT
RU
ES
LV
SE
SL
FI
NL
SK
SR
TR
UA
Preuzmite priručnik na hrvatskom jeziku (PDF, 6.04 MB)
(Čuvajte okoliš i ovaj priručnik ispišite samo ako je nužno)

Loading…

Ocjena

Ostavite ocjenu proizvoda Electrolux PD91-4MG Usisavač i recite nam što mislite o njemu. Želite podijeliti svoje iskustvo s proizvodom ili postaviti pitanje? Ostavite komentar na dnu stranice.
Jeste li zadovoljni s Electrolux PD91-4MG Usisavač?
Da Ne
Prvi ocijenite ovaj proizvod
0 glasovi

Pridružite se razgovoru o ovom proizvodu

Ovdje možete podijeliti što mislite o Electrolux PD91-4MG Usisavač. Ako imate pitanja, prvo pažljivo pročitajte priručnik. Zahtjev za priručnik možete izvršiti putem našeg obrasca za kontakt.

Više o ovom priručniku

Razumijemo da je lijepo imati papirnati priručnik za svoj Electrolux PD91-4MG Usisavač. Uvijek možete preuzeti priručnik s naše web stranice i sami ga ispisati. Ako želite imati originalni priručnik, preporučujemo da kontaktirate Electrolux. Oni bi mogli osigurati originalni priručnik. Tražite li priručnik za svoj Electrolux PD91-4MG Usisavač na drugom jeziku? Odaberite željeni jezik na našoj početnoj stranici i potražite broj modela da vidite imamo li ga na raspolaganju.

Tehnički podaci

Marka Electrolux
Model PD91-4MG
Kategorija Usisavači
Vrsta datoteke PDF
Veličina datoteke 6.04 MB

Svi priručnici za Electrolux Usisavači
Više priručnika za Usisavači

Često postavljana pitanja o Electrolux PD91-4MG Usisavač

Naš tim za podršku pretražuje korisne informacije o proizvodu i odgovore na česta pitanja. Ako u častim pitanjima naiđete na netočne informacije, obratite nam se putem obrasca za kontakt.

Crijevo mog usisavača je začepljeno, što mogu učiniti? Potvrđeno

Odvojite crijevo i pregledajte ga da biste utvrdili je li stvarno začepljeno. Ako je to slučaj, možete uzeti dugački predmet poput metle i pažljivo ga progurati kroz crijevo. To će obično ukloniti sve predmete koji začepljuju crijevo. Ako vam ovo nije pomoglo, obratite se proizvođaču.

Ovo je bilo korisno (1464) Čitaj više

Koje veličine postoje vrećice za prašinu? Potvrđeno

Dvije su veličine koje treba uzeti u obzir. Prva je veličina ploče s ulazom u vreću. To određuje hoće li vrećica za prašinu stati na određeni usisavač. Tada je veličina torbe. To je uglavnom naznačeno u litrama i određuje koliko prašine vreća može držati.

Ovo je bilo korisno (941) Čitaj više

Želim znati starost svog Electrolux uređaja. Kako da to učinim? Potvrđeno

Pomoću serijskog broja možete odrediti starost svog proizvoda. To se može pronaći na vašem uređaju. Prvi znak serijskog broja označava godinu (tj .: 1 = 2001), a dva znaka nakon toga označavaju tjedan proizvodnje (tj.: 35 = 35. tjedan te godine). Dakle, serijski broj 13500016 označava da je stroj iz 35. tjedna 2001. godine.

Ovo je bilo korisno (836) Čitaj više

Kabel za napajanje mog usisavača ne vraća se natrag u uređaj, što mogu učiniti? Potvrđeno

Moguće je da se kabel zavrne ili preklopi. Potpuno razmotajte kabel nekoliko puta i premotajte ga natrag u uređaj pod vodstvom ruku. Ako ovo ne riješi problem, moguće je da je mehanizam za premotavanje kabela slomljen. U tom slučaju kontaktirajte proizvođača ili servis za popravak.

Ovo je bilo korisno (658) Čitaj više

Moj usisavač proizvodi zvižduk, što mogu učiniti? Potvrđeno

Ovaj problem često uzrokuje puna vreća za prašinu ili filtar ili kada postoji otvor koji propušta zrak u crijevo. Provjerite vrećicu za prašinu i filtar te ih po potrebi zamijenite. Provjerite ima li na crijevu rupa ili loših spojeva. Ako ovo ne riješi problem, obratite se proizvođaču.

Ovo je bilo korisno (551) Čitaj više

Kako mogu ukloniti prašinu i dlake s glave četke za usisavač? Potvrđeno

Uklanjanje prašine i dlaka s glave četke za usisavač vrši se ručno. Ako to ne bude išlo po želji, moguće je finim češljem ukloniti preostalu nečistoću.

Ovo je bilo korisno (536) Čitaj više

Koju postavku na glavi četke za usisavač trebam koristiti? Potvrđeno

Gotovo svi usisavači imaju glavu s podesivom četkom. Koristite četku za tvrde površine kako biste spriječili ogrebotine i oštećenja. Isključite četku za tepihe i sagove.

Ovo je bilo korisno (419) Čitaj više

Mogu li više puta koristiti papirnatu vrećicu za prašinu? Potvrđeno

To nije uputno. Pore ​​vrećice bit će zasićene, što će uzrokovati gubitak usisavanja i možda oštetiti motor.

Ovo je bilo korisno (286) Čitaj više

Što je HEPA? Potvrđeno

HEPA znači visokoefikasni zrak u obliku čestica. Mnogi usisavači imaju HEPA filter. HEPA filtar zaustavit će najmanje 85%, a najviše 99,999995% svih čestica od 0,3 mikrometra (µm) i više.

Ovo je bilo korisno (260) Čitaj više

Mogu li koristiti obični usisavač za usisavanje pepela? Potvrđeno

Ne, to apsolutno nije moguće. Pepeo koji se čini ohlađenim može iznutra još uvijek biti topao ili čak vruć. Obični usisavač nije predviđen za to i može izazvati požar. Također, filtri uobičajenih usisavača nisu uvijek prikladni za zadržavanje izuzetno malih čestica poput pepela. Tada može doći do motora usisavača i nanijeti štetu.

Ovo je bilo korisno (251) Čitaj više
Priručnik Electrolux PD91-4MG Usisavač