
Before using the unit for the first time, please read all instructions and warnings for the benefit of safe
Moon phase
operation. Please retain these instructions for use.
The unit automatically determines the actual Moon phase using the date set, which is indicated by 8 different icons:
• forecast weather symbols • current moon phase indicator • DCF 77 radio controlled clock with adjustable time
zone setting • 12 / 24-hour time format • date and day of week display • 433,92 MHz outdoor temperature and
humidity transmitter, 60 m range in open terrain • the weather station works with up to 3 outdoor transmitters •
outdoor/indoor humidity and temperature display • outdoor and internal temperature trend display • individually
adjustable temperature alarm values • alarm with snooze function • easy setup
Full moon Waning Gibbous Last quarter Waning Crescent New moon Waxing Crescent First quarter Waxing Gibbous
Comfort zone display
Based upon the indoor environment readings, the following icons can appear:
PARTS OF WEATHER STATION
Weather station ( )
If the temperature is not between 20°C and 28°C, or the relative humidity is between 40 and 70%, there is no display of information.
Outdoor temperature and humidity
On the weather station
Pressing the CHANNEL button will select temperature or relative humidity display from among transmitters 1, 2 or 3.
On the outdoor transmitters
The temperature, relative humidity (RH) and current channel will display on the LCD display of the outdoor transmitter. The °C/°F button
under the battery compartment lid is used to switch between °C and °F temperature display. This setting has no effect on the outdoor
temperature unit displayed on the weather station.
Temperature units
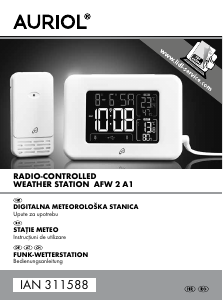
Outdoor transmitter (Figure 2)
Briefly pressing the DOWN button on the weather station toggles display in Celsius degree (°C) or Fahrenheit degree (°F) units.
20. LCD display
21. wall-mounting hook
Measured value extremes
22. battery compartment
It is possible to display the maximum and minimum measured values for both the outdoor and indoor temperature and relative humidity.
Press the UP / Min button once for the highest (MAX), and once more for the lowest (MIN) values. The extreme figures can be cleared by
keeping the UP button pressed for 1 seconds while the highest (or lowest) value is displayed. The unit confirms deletion with a short
SETUP AND SETTINGS
beep.
Quick setup
The extremes are stored by the unit from the time it is set up or from the time the last extreme is cleared
1. After unpacking the product, check that it has not been damaged in transport. Do not install if damaged.
2. First, insert 2 x 1.5 V AA batteries into the weather station then 2 x 1.5 V AAA batteries into the outdoor transmitter, observing the
Current Time & Alarm
polarity markings.
Briefly pressing the ALARM button will toggle the current time and alarm time display. The unit will return to time display 1.5 minutes later.
The weather station will then automatically search for and register the outdoor transmitters for 3 minutes. The signal reception icon will
The alarm can be activated by briefly pressing the SET button. A bell icon (2) appearing confirms this.
flash in the meantime. On successful reception, the outdoor temperature and humidity will display. If no signal is received, try to manually
Daylight saving time is indicated by the abbreviation DST above the current time.
pair the outdoor transmitter.
Then the setting will continue with the automatic reception of the DCF77 clock signal. The DCF77 signal (9) will flash on the display.
TROUBLESHOOTING
Meanwhile, position the weather station so that it receives a clear DCF77 signal. This is indicated by the full DCF77 symbol flashing. A
stronger signal can be received in a westward facing window, far from TV sets or monitors, and at night when interference is at a
minimum.
Setup takes 3-8 minutes and on successful setup, the DCF77 symbol will display. This completes setup of the time and date.
If no signal can be received, try manually tuning in the DCF77 clock signal, or setting the time, date and day of week language manually.
The day of week language can only be set manually.
Location
The weather station and the outdoor transmitter can be either wall-mounted or placed on a horizontal surface by opening the stand. To
ensure accurate measurement, select a dry and shaded location for the outdoor transmitter. Even though it is resistant to splashing
water, it must not be exposed to constantly high humidity.
Preferably move the units away from other electromagnetic signal sources that may cause electrical interference.
Please note that the transmitter's range is 60 m in the open range, which of course is reduced by building walls, reinforced concrete
structures and other radio-frequency interference sources.
Manual Pairing of Outdoor Transmitter
The default channel used by the outdoor transmitter is Channel #1. If you want to use additional outdoor transmitters (max. 3) with the
weather station, they must be set to unique channels.
Setting channels other than Channel #1: after inserting the battery, select channel #1, #2 or #3 by pressing the CH button on the outdoor
transmitter. The outdoor transmitter's LCD display will accordingly show CH 1, CH 2 or CH 3. Afterwards, keep the CHANNEL button
pressed on the weather station until a short beep is heard. Then the weather station will search and register any new outdoor
CLEANING & MAINTENANCE
transmitters again while the signal icon will continuously blink. On successful reception, the outdoor temperature and humidity will
display alongside the channel number.
Care
If no signal is received, check the batteries in both the weather station and the outdoor transmitter.
1. A slightly dampened cloth can be used to clean the equipment. Aggressive detergents can mar the units' finish.
2. Do not allow water to enter the weather station.
Manual reception of DCF77 clock signal
3. When not planning to use the units for an extended period of time, remove the batteries.
DCF77 is a long-wave (77.5 kHz) atomic clock synchronization signal transmitter in Mainflingen, Germany, 25 km SE from central
Frankfurt. The atomic clock is accurate to 1 second per one million years. The signal can be received inside a radius of 2000 km, thus
Changing Batteries
throughout Europe. It is used to automatically adjust the current time and date, the day of the week as well as the daylight savings time.
Replace the battery in the weather station if a battery symbol appears above to the time display. If a battery status icon corresponding to
The weather station automatically updates itself using the DCF77 clock signal at 2:05 AM every day. If necessary, this procedure can be
the current outdoor transmitter appears (on the weather station's or the outdoor transmitter's display), the battery should be replaced in
performed anytime manually. In order to do so, keep the UP button pressed for approx. 1 seconds. The unit will emit a short beep and the
that transmitter. If the batteries have leaked electrolyte, wear protective gloves and goggles and clean the battery compartment with a
DCF77 symbol (9) will flash. Meanwhile, position the weather station so that it receives a clear DCF77 signal. This is indicated by the full
dry cloth. Insert the new batteries observing the polarity.
DCF77 symbol flashing. If only the symbol is visible, there is no DCF77 signal at that moment.
Important! The outdoor transmitters must be paired with the weather station after battery replacement.
If synchronization fails even on completing the set-up procedure, manual adjustment of the time and date is possible.
Manual set-up of the time, time zone, date and day of week language
WARNINGS
When the current time is displayed, press and hold the SET button for approx. 1 second. The adjustable values will begin to blink in the
• The weather station is intended only for indoor use only, in a dry place.
following sequence which can be toggled using the SET button:
• Even though the outdoor transmitter is protected against splashing water, it should be located in shady and dry place.
year, month, date, display language of day of week: English (EN), German (GE), Italian (IT), French (FR), Dutch (NE), Spanish (ES),
• Do not expose the unit to radiating heat, direct sunlight, vibration or humid, dusty areas
Danish (DA); time zone difference (-12 h - +12 h); 24- or 12-hour display format; hour; minute. The values can be adjusted using the
• The weather station is intended only the above-mentioned use, in a residential environment. It is not suitable for medical or commercial
DOWN or UP buttons. Afternoon hours are indicated by PM if 12-hour time display is selected.
use.
A successful reception of the DCF77 signal will overwrite the manual setting (time and date), however, it will not modify the day of week
• Do not place any open flame sources such as burning candles on the unit.
language.
• Never attempt to disassemble the unit.
Setting the Alarm
• The product and its batteries are not toys. Keep out of reach of children.
The alarm time can be set by keeping the ALARM button pressed. The adjustable blinking values are as follows in sequence: hours and
• Do not use different types of batteries and/or used and new batteries together.
minutes, which can be toggled using the ALARM button. The values can be adjusted using the DOWN and UP buttons.
• Do not open, burn or short-circuit the batteries. Do not charge any non-rechargeable batteries. Danger of explosion!
Setting the Temperature Alarm
• In case of any anomaly, immediately power off the unit and contact the retailer.
It is possible to activate or deactivate the temperature alarm for each outdoor transmitter channel. To do so, press and hold the DOWN
button on the weather station. The unit will then display a blinking indicator for channel #1 whether the temperature alarm is active (ON)
or not (OFF). The channel to be adjusted can be selected using the CHANNEL button. The temperature alarm can be activated on the
Do not discard with communal waste. At the end of its life, dispose of product at a facility specializing in the collection of electronic
thus selected channel using the DOWN or UP buttons. Press the SET button to first select the upper then the lower temperature alarm
waste. If you have any question or remark in connection with this, contact the seller or local waste management organization. By
threshold then adjust it using the UP and DOWN buttons. Finalize the setting using the SET button.
doing so, you will protect the environment as well as the health of others and yourself.
The lower/upper threshold icon will appear alongside the temperature for channels where this setting has been activated.
DISPOSING OF ALKALINE AND RECHARGEABLE BATTERIES
FUNCTIONS
Batteries, whether alkaline or rechargeable, must not be handled together with regular household waste. It is the legal obligation of the
Temperature alarm
product's user to dispose of batteries at a nearby collection center or at a retail shop. This ensures that the batteries are ultimately
Where the temperature rises above or falls below the respective upper or lower alarm threshold on any channel where this function has
neutralized in an environment-friendly way.
been activated, the weather station will sound an audible alarm. During an alarm, the temperature and the icon corresponding to the
lower or upper limit will blink.
STATEMENT OF CONFORMITY
Warning: The alarm will be repeated until the temperature falls between the lower and upper threshold values, or until the alarm function
This piece of radio equipment is compliant with the essential requirements of Directive 1999/5/EC (R&TTE).
is cancelled on the given channel.
The current EU Declaration of Conformity can be requested from the e-mail address somogyi@somogyi.hu.
Alarm
The unit is suitable for use in the member states of the European Union.
The unit will sound an alarm by beeping at the active alarm time. If you do not wish to get up immediately, press the SNOOZE button
during the alarm. This will temporarily pause the alarm, the snooze icon (8) will blink on the display then the unit will repeat the alarm in 5
TECHNICAL PARAMETERS
minutes. To end the current alarm, press any button.
Weather Station
Weather forecast
power supply: 2 x 1.5 V (AA) batteries (not included)
The unit indicates the forecast weather using 4 different icons:
measuring range indoor temperature/resolution: -9 – 50°C / 0.1°C
indoor humidity: 20 – 99% RH
dimensions (w × h × l): 126 x 185 x 28 (90)mm
display size (w x h): 63 x 108 mm
Outdoor transmitter
power supply: 2 x 1.5 V (AAA) batteries (not included)
measuring range temperature/resolution: -50 – +70°C / 0.1°C
Sunny Partly cloudy Cloudy Rainy
humidity: 20 – 99% RH
transmission frequency: 433,92 MHz
The icon does not indicate the actual weather but a 12- to 24-hour weather forecast. The forecast accuracy is 70%.
polling rate: every 1 minutes
range: 60 m, open range
Temperature trend indicator
dimensions (w × h × l): 60 x 96 x 26 (50) mm
An arrow alongside the outdoor and indoor temperatures indicates the temperature trend on the weather station. This can be
decreasing, steady or rising.
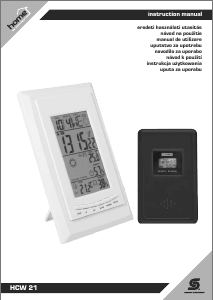
Figure 1
Dry environment Ideal environment Wet environment
weather station with outdoor transmitter
HCW 21
0
0
0
0
0
0
0
0
0
1. date and day of week 11. DOWN button
2. alarm function active 12. UP button
3. current time 13. SET button
4. forecast weather symbols 14. ALARM button
5. comfort zone icon 15. CHANNEL button
6. outdoor temperature, temperature trend and relative humidity 16. SNOOZE button
7. moon phase 17. wall-mounting hook
8. snooze function active 18. battery compartment
9. DCF77 radio controlled clock symbol 19. fold-out support
10. indoor temperature, temperature trend and relative humidity
Cause Solution
The weather station or the outdoor transmitter does not work.
The weather station is not receiving the DCF77 signal.
Check the charge and polarity of the batteries!
Check the outdoor transmitter's batteries!
Check the selected channel on the weather station and outdoor transmitter!
Perform the manual pairing of the outdoor transmitters!
Relocate of reorient the unit!
Locate the weather station closer to the outdoor transmitter!
Relocate or reorient the weather station!
Adjust the clock manually!
Wait for an automatic night-time DCF77 reception!
The weather station is not receiving a signal from the outdoor
transmitter(s).


Pridružite se razgovoru o ovom proizvodu
Ovdje možete podijeliti što mislite o Somogyi HCW 21 Meteorološka stanica. Ako imate pitanja, prvo pažljivo pročitajte priručnik. Zahtjev za priručnik možete izvršiti putem našeg obrasca za kontakt.
odgovori | Ovo je bilo korisno (1) (Preveo Google)
odgovori | Ovo je bilo korisno (0) (Preveo Google)